2019年1月10日 星期四

AIoT軟體架構圖


實現一個AIoT架構,一個可能的方式參考下列作法

在Raspberry Pi 這邊, 將一個ML/DL Model 所預測出來的結果, 也許是0或1, 或是分類的softmax機率值等, 依據結果,以事件方式丟到雲端,再由雲端的程式負責進和外界的通訊,通訊的方式可以E-mail, LINE, MQTT, WebSocket等機制。

這樣的好處是資料與通訊管理的細節都在雲端處理, 而Raspberry Pi 只會根據AI預測的結果,於條件滿足的時候再會用到網路。好處: 終端能減少網路的使用, 而且也不必霊端方面的應用邏輯。並且能專司其職,懂AI的人專注在AI身上,懂雲端/Web 技術的人就專注這些Web技術。


#Python  code snippet 

利用python上驗證各種通訊程序, 包含 MQTT, LinePutsh,...


#Node.js code snippet 


// parse application/json
var jsonParser = bodyParser.json()

/MQTT
app.post('/agent/mqtt',jsonParser, function (req, res) {

  //console.log(req.body)
  console.log(req.body.topic);
  console.log(req.body.message);

//測試Linebot是否能通
app.post('/webhook', bot.parser());

//Line Push
app.post('/agent/line', function (req, res) {

  console.log('Line');

  ////Line code/////////////
 // pushLinemsg(req.body.message['0'])
 pushLinemsg(JSON.stringify(req.body.message))


  ////Repsone to http client/////
     respond_http(res);

});


#為使用Linebot 我們使用ngrok 來解決private IP及要提供https服務

./ngrok http 3010


2a87b84c.ngrok.io/webhook 貼到Line的設定中,並verify https 200 OK, 如果可以通代表ngrok 已打通的channel


2018年12月24日 星期一

2018年12月14日 星期五

CUDA driver version is insufficient for CUDA runtime version


問題1: 程式只要 import keras 就會掛掉!!

解法==> conda update keras
                conda update tensorflow


問題2: UDA driver version is insufficient for CUDA runtime version

\Anaconda3\lib\site-packages\tensorflow\python\client\session.py in __init__(self, target, graph, config)
    674     try:
    675       # pylint: disable=protected-access
--> 676       self._session = tf_session.TF_NewSessionRef(self._graph._c_graph, opts)
    677       # pylint: enable=protected-access
    678     finally:

InternalError: cudaGetDevice() failed. Status: CUDA driver version is insufficient for CUDA runtime version


解法==> 就是要讓 cuda driver和 cudnn 匹配. 若是在Anaconda , 因為Anaconda 會去做軟體版本匹配的整合, 所以最簡單的作法就是直接執行  conda update --all


若tensorflow 要使用底層GPU架構,要安裝對應的軟體.

Keras --> Tensorflow --> cuDNN --> CUDA Driver  --> GPU graphic card


cuDNN [1]: The NVIDIA CUDA® Deep Neural Network library (cuDNN) is a GPU-accelerated library of primitives for deep neural networks. cuDNN provides highly tuned implementations for standard routines such as forward and backward convolution, pooling, normalization, and activation layers. cuDNN is part of the NVIDIA Deep Learning SDK.

CUDA Driver : Driver for NVIDIA graphic card


References:

2018年11月18日 星期日

異常檢測技術

Abnormally detection , Outlier detection and novelty detection 


異常檢測技術用於各種領域,如入侵檢測、欺詐檢測、故障檢測、系統健康監測、傳感器網路事件檢測和生態系統干擾檢測等。它通常用於在預處理中刪除從資料集的異常資料。在監督式學習中,去除異常資料的資料集往往會在統計上顯著提升準確性。

就入侵檢測而言, 很難檢查駭客入侵的方法

Multi-classification 多分類
Binary-classification 分兩類  ==> 是或不是  
One-Classification ==> 單分類 檢查異常質Outlier  (正常很多, 但異常很少, 而且也難不好界定所有或描述的異常種類) ==> Unbalanced DataSet

mean: 容許圈圈中有多少比例的異常質被誤檢中


RBF: fit的程度

2018年11月3日 星期六

[Linux 程式設計] IPC--Message Queue


Linux 程式設計課堂CH8裡的msg1.c跟msg2.c都會出現如下問題
請問一下為什麼msgget會產生失敗??


fprintf(stderr, "msgget failed with error: %d\n", errno);  

errno: 88 是 #define ENOTSOCK 88 /* Socket operation on non-socket */

這錯誤是核心無法建立Message Queue


解決方式:  讓核心支援Message Queue

cd ~/linux-rpi-4.4.y ;  make menuconfig


 ( toolcahin 路徑要設定好且要有 ncurse.h 才行!)     sudo apt-get install libncurses5-dev

將 [General Setup] --> [POSIX Message Queues] 編進核心內 [*] 或編成核心模組 [M]


更多核心編譯及模組使用, 可參考 嵌入式Linux設計開發 


按講師提供的Linux程式範例, 執行的正常畫面像是這樣, 


2018年10月25日 星期四

安裝jupyter notebook 於Raspberry Pi


1.) 安裝 jupyter notebook 

sudo pip3 install jupyter   

(約等個15分鐘吧..耐心等候)

2.) 讓 jupyter-notebook Server 可從windows連入

==> jupyter notebook --generate-config

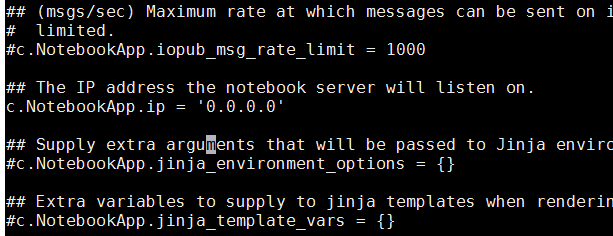
#修改 ~/.jupyter/jupyter_notebook_config.py 找到
#c.NotebookApp.ip = ‘localhost'

改成

c.NotebookApp.ip = '0.0.0.0’ 


# 設定瀏覽器登入 jupyter notebook server密碼

==> jupyter notebook password

3.)啓動jupyter-notebook 


sudo jupyter-notebook

如果是root ,則要多加 --allow-root 才能啓動    sudo jupyter-notebook --allow-root     


4.) 在windows上,打開瀏覽器連入

http://192.168.1.252:8888/


Note: 192.168.1.252 為 Pi的Ethernet IP, 也可以用Wi-Fi 的IP連入, 只要那個IP是Windows能連到的即可 (同一個router所配的IP都OK!)

如何查Pi的IP?  請執行ifconfig  ==> 查看Pi網路IP 

(更多Pi 的基礎操作, 請看課程學習 )


 成功登入 jupyter notebook畫面~


 看一下 jupyter notebook kernel 使用的python 版本