1.) 安裝 jupyter notebook
sudo pip3 install jupyter
(約等個15分鐘吧..耐心等候)
2.) 讓 jupyter-notebook Server 可從windows連入
==> jupyter notebook --generate-config
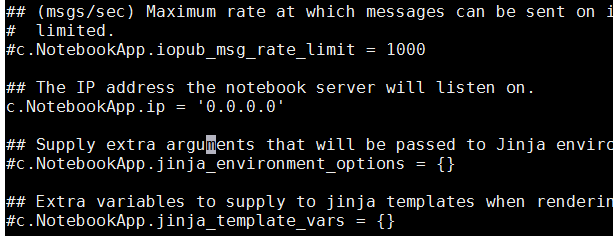
#修改 ~/.jupyter/jupyter_notebook_config.py 找到
#c.NotebookApp.ip = ‘localhost'
改成
c.NotebookApp.ip = '0.0.0.0’

# 設定瀏覽器登入 jupyter notebook server密碼
==> jupyter notebook password
4.) 在windows上,打開瀏覽器連入
http://192.168.1.252:8888/
(更多Pi 的基礎操作, 請看課程學習 )
成功登入 jupyter notebook畫面~
sudo pip3 install jupyter
(約等個15分鐘吧..耐心等候)
2.) 讓 jupyter-notebook Server 可從windows連入
==> jupyter notebook --generate-config
#修改 ~/.jupyter/jupyter_notebook_config.py 找到
#c.NotebookApp.ip = ‘localhost'
改成
c.NotebookApp.ip = '0.0.0.0’

==> jupyter notebook password
3.)啓動jupyter-notebook
sudo jupyter-notebook
如果是root ,則要多加 --allow-root 才能啓動 sudo jupyter-notebook --allow-root
sudo jupyter-notebook
如果是root ,則要多加 --allow-root 才能啓動 sudo jupyter-notebook --allow-root
4.) 在windows上,打開瀏覽器連入
Note: 192.168.1.252 為 Pi的Ethernet IP, 也可以用Wi-Fi 的IP連入, 只要那個IP是Windows能連到的即可 (同一個router所配的IP都OK!)
如何查Pi的IP? 請執行ifconfig ==> 查看Pi網路IP
(更多Pi 的基礎操作, 請看課程學習 )
成功登入 jupyter notebook畫面~
看一下 jupyter notebook kernel 使用的python 版本


Thanks for sharing, nice post! Post really provice useful information!
回覆刪除Giaonhan247 chuyên dịch vụ gửi hàng đi canada, gửi hàng đi úc với dịch vụ vận chuyển hàng đi campuchia hướng dẫn cách mua đồng hồ trên amazon với chi tiết bảng giá gửi hàng đi mỹ giá rẻ.