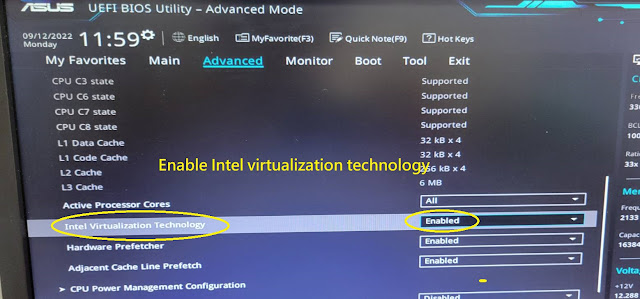
若不想一天到晚重灌系windows系統. 那麼這個功能是一定要啓用的~
2020年12月14日 星期一
2020年11月27日 星期五
TelegramBot 傳送貼圖的方法
TelegramBot 傳送圖片的方法
def start(update: Update, context: CallbackContext) -> None:
update.message.reply_text('Hi!')
update.message.reply_sticker('http://e2412fdcd657.ngrok.io/sticker.png')
而參數是圖片的URL位址
可以在windows 上利用MobaXterm 啓動HTTP Server 並把圖片(stciker.png)放在資料匣下. . 用瀏覽器存取 http://127.0.0.1/sticker.png
sticker.png要放在C:\Users\Joseph下
但telegram Server 無法存取此網址 127.0.0.1 ? 怎麼辧呢? 我們可以利用ngrok 在電腦上打一個洞. 讓外面Telegram Server 可以連進來我們在本機(Localhost)的HTTP Sever
下載ngrok Windows版本, 並點擊執行ngrok.exe, 接著鍵入 ngrok 80 , 將會出現底下畫面
在瀏覽器上打入 http://e2412fdcd657.ngrok.io/sticker.png , 若可以存取到. 則Telgram Server 就可以存取到了,這個網址就是貼在程式碼中的圖片位址
註: 免費的MobaXterm只有180秒啓動時間就會自動關閉, 可以自己架設其他的web Server. 或註冊MobaXterm
2020年11月17日 星期二
iPAS 物聯網應用工程師認證(葵花寶典)
0.) 關於iPAS 物聯網應用工程師考試簡介
1.) IoT 技術架構簡介
- IoT 架構: 感知層,網路層,應用層
- Cloud computing: IaaS,PaaS,SaaS. BaaS
- 物聯網規格標準四大陣營
- LPWAN 長距離低功耗通信技術 : NB-IoT vs LoRa
- 物聯網應用層通訊協定標準比較 CoAP vs MQTT
- MQTT Lab
- IoT Gateway (WSN,IEEE 802.15.4,Zigbee)
- 什麼是RSSI、SNR、dbm ?
- Project: Zigbee 無線自動燈光及溫度調控系統
- Project: BLE室內定位技術
- Cloud Platform: MediaTek Cloud Sandbox, ARM mbed Cloud,WISE-Paas,Xively, ThingSpeak,..
- ARM mbed Connector
- ARM mbed OS
4) 物聯網感測層
- 開源硬體
- MPU v.s. MPU ==> Raspberry Pi v.s. Arduino
- 其他: micro:bit , Rasperry Pi Pico, LinkIt
- 開源軟體規劃與授權規範: GPL,LGPL,Apache,CC
- I/O 通訊與控制
- Analog v.s. Digital
- UART,
- UART over TTL/RS232 , RS485/Modbus
- SPI
- I2C , Linux I2C Driver
- RFID Project: https://www.slideshare.net/itembedded/rfid-15614650
- 以瀏覽器作為IoT的進入點
- 第一頁通常是設計一個DashBoard, 呈現豐富的資訊量
- 用40分鐘了解什麼是HTML
- NoSQL-MongoDB
- 【物聯網應用實務】IoT裝置註冊的網頁設計方式-使用 Handlebars.js Template
ARM mbed 物聯網平台實戰(課程節錄)
https://youtu.be/sslJLgOPfCM
ARM mbed Cloud 平台架構簡介
https://youtu.be/GrMD8Me5qg0
IoT Gateway Demo
https://youtu.be/tZFMY5UIG6s
智慧POS機-人臉自動結帳
https://youtu.be/DHTQCF6t1Jw
AIoT智能居家燈控系統
https://youtu.be/Dcz28sASv0w
Control your Raspberry Pi using Line Bot
https://youtu.be/WL2RrYrGB1Q
Iot自動販賣機
https://youtu.be/9jxIuyiIXko
2020年10月5日 星期一
AI邊緣運算實作: TensorFlow Lite for MCU
AI邊緣運算
隨著物聯網與人工智慧發展,工作負載開始由雲端移轉至終端,AI也隨之進入到嵌入式系統及物聯網終端裝置中。在終端或所謂邊緣裝置這類的超低功耗微處理器上所實現的深度學習,被稱呼為微型深度學習。然而在MCU本身運算速度就不快,記憶體空間也有限的情況下,AI模型也不能太大,因此要能確保AI 效能,同時兼顧低功耗、成本與縮短開發時間,都是研發人員所必須面對的挑戰。
2020年10月2日 星期五
Quick guide for building Raspberry Pi kernel 4.4.x
For Driver course (www.ittraining.com.tw)
1) 安裝toolchain (Cross compiler)
# For 32 位元Linux
export PATH=/home/student/pi/tools/arm-bcm2708/arm-bcm2708-linux-gnueabi/bin:$PATH
# For 64 位元Linux
export PATH=/home/student/pi/tools/arm-bcm2708/arm-bcm2708-linux-gnueabi-x64/bin:$PATH
root@ubuntu:/home/student/pi# arm-linux-gnueabihf-gcc -v
..
gcc version 4.8.3 20140303 (prerelease) (crosstool-NG linaro-1.13.1+bzr2650 - Linaro GCC 2014.03)
2) Linux kernel 編譯
#進入kernel source tree
cd linux
# 產生 .config
For Raspberry Pi 2, Pi 3, Pi 3+, and Compute Module 3 default build configuration
KERNEL=kernel7
make ARCH=arm CROSS_COMPILE=arm-linux-gnueabihf- bcm2709_defconfig
For Raspberry Pi 4
KERNEL=kernel7l
make ARCH=arm CROSS_COMPILE=arm-linux-gnueabihf- bcm2711_defconfig
#編譯 Linux kernel、kernel module 及 device tree
make ARCH=arm CROSS_COMPILE=arm-linux-gnueabihf- zImage modules dtbs -j 2
# 安裝 kernel modulemake ARCH=arm CROSS_COMPILE=arm-linux-gnueabihf- INSTALL_MOD_PATH=../modules modules_install
sudo cp arch/arm/boot/zImage /boot/$KERNEL.imgsudo cp arch/arm/boot/dts/*.dtb /boot/
sudo cp arch/arm/boot/dts/overlays/*.dtb* /boot/overlays/
#複製 kernel modules 到 Raspberry Pi
tar zcvf modules.tar.gz modules
scp modules.tar.gz root@192.168.1.141:/root
tar zxf modules.tar.gz
解開後將 <kernel version> 目錄放到 /lib/modules/
----------------------------------------------------
在 Raspberry Pi 編譯kernel module
1.) copy kernel source to Raspberry Pi
scp linux-rpi-4.14.98-v7.tar.gz root@192.168.1.157:/root
tar zxf linux-rpi-4.14.98-v7.tar.gz
2.)建立連結到 kernel source
cd /lib/modules/4.14.98-v7
ln -sf /root/linux-rpi-4.14.98-v7 build
------------------------------------------------------------------------------------
3.) build driver module from source
cd kernel_driver/01_LED
.
├── chr_led.c
├── Makefile
└── test.c
make
├── chr_led.c
├── chr_led.ko
├── chr_led.mod.c
├── chr_led.mod.o
├── chr_led.o
├── Makefile
├── modules.order
├── Module.symvers
└── test.c
發生 fixdep error! Exec format error
進入kernel source 重新產生ARM版本的工具集
cd /root/linux-rpi-4.14.98-v7
make scripts
4.) 測試 module
#載入模組sudo insmod chr_led.ko
#顯示所有模組
#用user應用程式測試driver
gcc test.c -o test
sudo ./test ==> 你會看見LED 在閃礫
#卸載模組
rmmod chr_led
2020年9月18日 星期五
好用的SSH Client : MobaXterm
在windows上用Virtual Box 建置Linux主機
下載VirtualBox 軟體: https://www.virtualbox.org/wiki/Downloads
下載 Ubuntu Image (取得一個已經包含完整系統的虛擬應用裝置檔案ova檔)
 |

其他
1.) 在windows使用SSH Client登入Ubuntu

設定時區
sudo timedatectl set-timezone Asia/Taipei
date

2020年9月7日 星期一
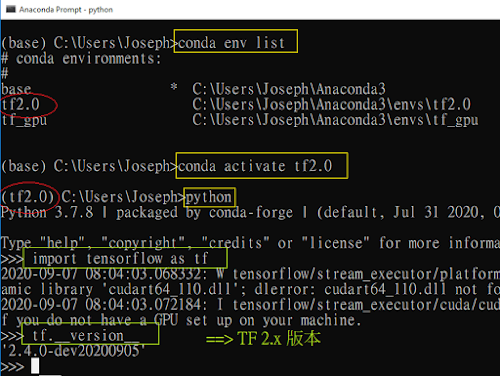
win10安裝 Anaconda +Tensorflow2.0
conda create -n tf2.0 python=3.7
#啓用虛擬環境並安裝TF2.0 (穏定版本)
conda activate tf2.0
pip uninstall numpy
pip install numpy==1.16.2
conda install jupyter
#在虛擬環境tf2.0, 進入python 互動環境(REPL)並檢查TF版本
python
import tensorflow as tf
tf.__version__

#移除conda虛擬環境tf2.0
conda env remove --name tf2.0
pip install tf-nightly --upgrade
2020年9月3日 星期四
使用Google Compute Engine 建置Linux環境
申請Google Compute Engine 90天試用
申請時雖然會需要輸入信用卡號.但90天內使用是不用錢的 ~
1.) 建置虛擬主機
基本上其他的設定都預設就可以了, 在最下方, 按下 [建立] 就這樣清鬆地建立一台LINUX 主機了. 接下來就是遠端登入使用這台主機了.
2.) 使用SSH 登入GCE的Linux Ubuntu
使用SSH登入, 只允許使用RSA認證的方式登入。我們可以使用puttygen.exe 來產生成對的RSA public key & private key
3.) 在GCE/[中繼資料] 和 [安全殼層金鑰] 新增一組RSA Public key
2020年9月2日 星期三
Python Open GL及RL 套件安裝
執行 python3 -V 會顯示python的版本 ==> Python 3.6.9
執行 Hello PyBullet World 範例
新增一個純文字檔案, 將下列代碼複製貼上, 並存為test.py
[References]
2020年8月9日 星期日
DYNAMIXEL Motor: R+ Manager 2.0
選擇 DYNAMIXEL X 系列(因為我們是XL430-W250 servo)
Baudrate : 57600 bps (出廠預設)開始掃描, 成功掃描到 XL430-250 motor


