2016年11月16日 星期三

ARM mbed 系統架構(1)


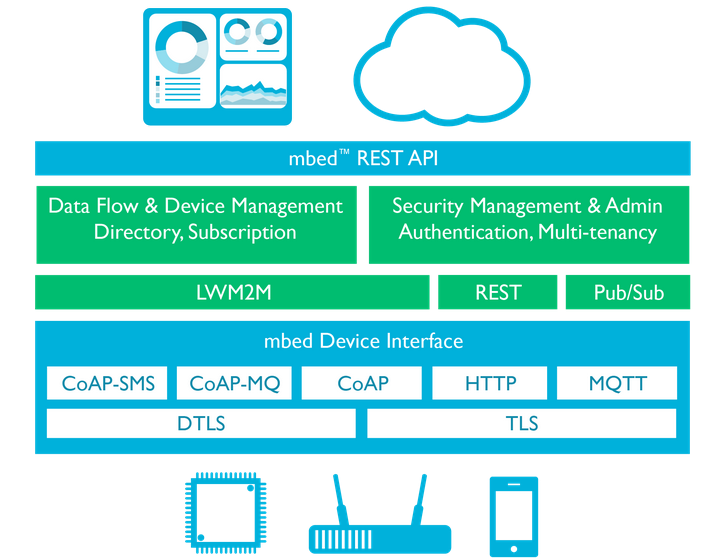
 ARM mbed 系統架構, 基本類似於OIC/OCF的參考實作 ,任何sensor或硬體都是以抽象的資源來定義(也就是OIC的Resource Oriented Architecture 的實作架構, 遠端存取這些資源則使用Restful API (採OMA LWM2M的Resource path) 方式, 存取不同的硬體資源, 就是給不同的資源路徑.

物聯網目前協定就是要走IP-Based , 所以基本上不論底層協定是什麼, 如短距離 Bluetooth、Wi-Fi、 Zigbee、 Thread, 或長距離 Cellular 3G/LTE 最終都必須是IP或透過 6LoWPAN介接成IP (IPv4或IPv6).

在應用層協定使用

MQTT、HTTP--> TCP--> TLS (如須加密)
CoAP-->UDP--> DTLS  (如須加密)

其資源描述使用OMA LWM2M的架構, 對資源存取的行為包含CRUDN

C: create
R: read   --> GET
U:update--> PUT
D:delete
N:notify
「arm mbed architecture」的圖片搜尋結果
mbed device (mbed os)


「arm mbed architecture」的圖片搜尋結果
mbed connector service


https://goo.gl/wzIHdR

物聯網規格標準四大陣營


The challenge for the IoT ecosystem is to ensure these emerging IoT devices can connect securely and reliably to the Internet and to each other.

陣營的目的在推動IoT裝置互連標準, 統合晶片、軟體、平台、成品, 制定相容性的標準
AllSeen與OIC均在訂立一個互通性的框架,遵循此框架可讓應用程式、作業系統、通訊技術與協定、硬體裝置等各層次互通,避免不相容的問題及重複開發的浪費等。

Thread Gourp
  • Nest(Goolge)、ARM、Freescale、Silicon Lab
  • 主推智慧家庭
  • Thread比較類似家用物聯網需求的升級版ZigBee
  • 支持IPv6(IPv6 over Wireless Personal Area Network, 6LoWPAN)
  • 追求與ZigBee、Bluetooth一樣的省電性


OIC (Open Interconnect constorium)
  • 「iotivity architecture」的圖片搜尋結果
  • Intel、Samsung、Dell、Broadcom、Atmel、Wind River 等6家成立
  • .2014年7月成立,旨在定義一個通用的通訊框架,以強化物聯網(IoT)裝置及服務的連結與互連。
  • 改為OCF (Open connectivity Foundation): Cisco、Intel、Microsoft 集結了來自AllSeen的成員, 聯發科、宏碁都是陣營成員
  • OCF創始會員涵括OIC及AllSeen陣營
  • OIC定義的參考實作 : 開放原始碼專案 IoTivity (https://www.iotivity.org/)
  • IoTivity is an open source software framework enabling seamless device-to-device connectivity to address the emerging needs of the Internet of Things.
  • Resocure-orientd Architecture
  • Restful Architecture
  • Common Platform
  • CoAP for Constrained Devices、HTTP
  • Certificaton program
「oic full stack」的圖片搜尋結果

AllSeen Alliance
  • Qualcomm、Microsoft、LG、海爾、松下、夏普、HTC、D-link、Samsung
  • 2013年底成立
  • AllSeen定義的參考實作(開放原始碼專案) : Alljoyn
Homekit
  • Apple
Thread技術方面,Thread是一種新的物聯網無線網路,與Wi-Fi、Bluetooth等屬相同層次,相對的,AllSeen與OIC追求廣泛支援各種網路技術,不僅支援Wi-Fi、Bluetooth,也支援ZigBee、Z-Wave、ANT+等。

有ZigBee為何還需要Thread?


Thread技術與ZigBee技術最相近,然已有ZigBee為何還需要Thread?估在於ZigBee的支援面太廣,ZigBee在網路層就分成ZigBee/ZigBee PRO、RF4CE、ZigBee IP等三大類,在三大類之上又有10種以上的應用型態(Application Profile),雖已有偏智慧家庭層面的應用型態,如ZHA(ZigBee Home Automation)、ZLL(ZigBee Light Link)、ZRC(ZigBee Remote Control),但也要兼顧產業用、零售用等發展,家用物聯網恐難全心投入。
Thread 設定家庭使用,因此Thread只要能支援200多個裝置(節點)即可,ZigBee的多數家用情境也在255個(8-bit)裝置內,ZigBee PRO的65,536個(16-bit)裝置多屬產業應用,如極長運輸路徑的油管壓力監控,智慧電網(Smart Grid)的大面積用電情形監控等。Z-Wave同樣屬家用訴求,最多僅支援236個裝置。


參考

2016年11月13日 星期日

gnuplot


唸書時期畫的, 工程圖表就是用gnuplot

Gnuplot is a portable command-line driven graphing utility for Linux, OS/2, MS Windows, OSX, VMS, and many other platforms. The source code is copyrighted but freely distributed (i.e., you don't have to pay for it). It was originally created to allow scientists and students to visualize mathematical functions and data interactively, but has grown to support many non-interactive uses such as web scripting. It is also used as a plotting engine by third-party applications like Octave. Gnuplot has been supported and under active development since 1986.

    # Gnuplot script file for plotting data in file "force.dat"
      # This file is called   force.p
      set   autoscale                        # scale axes automatically
      unset log                              # remove any log-scaling
      unset label                            # remove any previous labels
      set xtic auto                          # set xtics automatically
      set ytic auto                          # set ytics automatically
      set title "Force Deflection Data for a Beam and a Column"
      set xlabel "Deflection (meters)"
      set ylabel "Force (kN)"
      set key 0.01,100
      set label "Yield Point" at 0.003,260
      set arrow from 0.0028,250 to 0.003,280
      set xr [0.0:0.022]
      set yr [0:325]
      plot    "force.dat" using 1:2 title 'Column' with linespoints , \
            "force.dat" using 1:3 title 'Beam' with points


===================

Gnuplot - for loop iteration 產生多個不同檔案
windows gnuplot產生 png


#set terminal postscript eps
#set output 'myfigure.eps'
#set term png
set autoscale
set title 'P-persistent Simulation (Channel=3)'  font ",28"       # plot title
set xlabel 'Probability' font ",16"                                  # x-axis label
set ylabel 'Throughput' font ",16"                         # y-axis label
#set yrange [0:1]
#set xrange [1:8]

set label 'ittraining' at 12,8
#N_CHANNEL,N_user,prob,total_T/MAX_N_Round);

do for [t=0:5] {
    set terminal pngcairo
    outfile = sprintf('test%03.0f.png',t)
    set output outfile
plot \
'C3U1.txt' using 3:4 w lp t "U=1",\
'C3U3.txt' using 3:4 w lp t "U=3",\
'C3U5.txt' using 3:4 w lp t "U=5",\
'C3U7.txt' using 3:4 w lp t "U=7",\
'C3U9.txt' using 3:4 w lp t "U=9",\
'C3U11.txt' using 3:4 w lp t "U=11",\
'C3U13.txt' using 3:4 w lp t "U=13",\
'C3U15.txt' using 3:4 w lp t "U=15",\
'C3U17.txt' using 3:4 w lp t "U=17",\
'C3U19.txt' using 3:4 w lp t "U=19"


}


References:

  1. https://sourceforge.net/projects/gnuplot/?source=typ_redirect
  2. DEMO Gnuplot http://gnuplot.sourceforge.net/demo/
  3. http://www.maths.manchester.ac.uk/~pjohnson/Gnuplot/windows_gnuplot.html


2016年10月23日 星期日

Robomong --MongoDB 前端資料庫管理界面


MongoDB – Allow remote access


MongoDB 預設只允許local (127.0.0.1) 連入操作, 改成可以遠端可以操作

(1) sudo vim /etc/mongod.conf

把 bindIp 改成 0.0.0.0 

(2) 修改後要重新啓動MongoDB

sudo service mongod restart


在 netstat 可以看到 Port 27017 在 Listen

tcp   0   0 0.0.0.0:27017           0.0.0.0:*    LISTEN


Note: 若有防火牆時, tcp port 27017 必須允許任可人連入


Robomong --MongoDB 前端資料庫管理界面


可以去下載 Robomong (https://robomongo.org/), 這是一個MongoDB 前端資料庫管理界面, 可以遠端連線到MongoDB Server上 


"Create" 新增連線", 右下方"connect" 連線到MognoDB

輸入MongoDB IP 及Port (預設27017) , 左下角有"Test"可以測試一下是否連線正常

點選你的collection, 顯示全部資料 (Documents)

選擇用Table 方式呈現

點選你的collection 按右鍵, 會顯示可以用的操作. 如Collection 更名、複製Collection、刪除Collection等, 也可以插入資料(Document)等

對Documents 中的欄位, 可以按右鍵進行文字編輯, 但須符合JSON格式 ,修改完後 "Save" 離開


How To Install MongoDB on Ubuntu 14.04


2016年10月15日 星期六

MDK-ARM (Keil uVision) +J-Link 進行開發

MDK-ARM (Keil uVision) +J-Link 進行開發


J-Link是ARM 針對Cortex-M 系列的MCU的Debugger 通用工具, 一般兩種界面,JTAG (5-wire)或SWD(2-wire),

現在大多使用後來的二線的SWD界面, 即SWDCLK及SWDIO, 一個作為clock線一個作為資料線, 類似I2C通訊方式。


J-Link 


From https://www.segger.com/


3.3V 和 GND 可以提供電源給開板子


GND, SWDCLK, SWDIO, 3.3V


Debugger設定使用J-Link 


要先安裝好J-link driver

以下說明針對J-Link SWD 的debug 方式

開啓Keil uVision , 在 Flash->Configure Flash Tools... 中, 選擇 Debug Tag 選擇, 選擇使用J-Link/J-TRACE Cortex, 並進入Setting, 在Adapter 的 port 要選擇SW而非JTAG。若此時有正確連接到Cortex-M板子, SW Device會出現訊息。


實際J-Link接線


(1) 板子電源也由J-link提供


(1) 板子電源另外由USB port 提供, J-Link僅作為SWDebug使用


(3) 接新唐NANO102SC2AN開發板 (Reset不用接)


J-Link OB

目前其實也有很多EVM 板子, 直接就附在板子上了(這樣才方便推廣晶片?!) 如STMFx系列(稱作ST-Link) 或新唐Nuvton 系列 (稱作Nu-Link)

Having a J-Link right on the eval board allows customers to fully use and test the target CPU, providing full debug capabilities. At the same time, the eval board can remain small and inexpensive (J-Link OB on eval board example). All features of the regular J-Link can be used, including download into Flash memory.


From https://www.segger.com/

相關連結:


2016年10月13日 星期四

在GitHub 建立Organizations


GitHub 上有種類型帳號


Personal User Account 與 Organization Account

Your user account is your identity on GitHub. Your user account can be a member of any number of organizations, regardless of whether the account is on a free or paid plan.

什麼是組織?

組織的目的就是方便對GitHub上進行階層性的程式碼管理。

可以在組織下長Repository,而不是個人帳號下長Repository。 建立組織後,可以邀請其他人加這個組織中。不同組織可以有自己的名稱,再由不同組織去長出一堆Repository。

組織的角色除了Owner以外, 就是成員(Member), Owner也可以有很多人。 Owner 可以可以邀請其他人加入這個組織, 並對不同成員給予不同的權限, 也可以指定某些成員變成組織的Owner。

成員的權限, 包含是否可以建立Repository或是可讀可寫(clone+push+pull)或僅能唯讀(clone+pull)。

組織中的人可以自由選擇離開這個組織,但一個組織至少得有一個人存在, 這個人就是Owner,
因為一個組織必須至少隸屬於某一個Owner帳號。倘若最後一個Owner也要離開此組織是不允許的, 你只能直接刪除組織。

建立組織的方式:

(1)  從申請的個人User帳號, 去建立一個組織(Organization),則此時這個Personal 帳號就是目前組織中唯一的owner,

(2)
從既有的User帳號(可能早已包含一堆Repository), 轉為組織 (前提是這User帳號不可以存在於任何組織中), GitHub會自動將原個人帳號所包含的全部Repository 掛在這個組織下。(小心!則此時Personal 帳號就無法再用了, 因為已經變成組織了, 所以你必須再轉換前, 事先申請好另一個GitHub帳號, 然後建立組織時, 把這個事先已申請來的帳號, 成為這個組織的Owner, 等於反過用這個帳號來管理這個從user變成組織的組織。

建構組織的流程

Step 1:Set up a personal account
Step 2:Set up the organization
Step 3:Invite members to organization

Personal user accounts

Every person who uses GitHub has their own user account. These accounts include:

Organizations

Organizations are great for businesses and large open-source projects that need multiple owners and admins. They include:
Organizations paid plan:

  1. Unlimited members and public repositories for free.
  2. Unlimited private repositories at $25/month for your first 5 users. $9/month for each additional user.

2016年10月12日 星期三

TortoiseGit與GitHub


Git 是一種分散式 Source code 管理系統, 相對於SVN , SVN 則是屬於Client/Server 架構.

在SVN 裡, 每一次的commit 都是送到Server的 Repository上, 而在Git 每一次commit 都是送到Local Repository , 若要分享每次變更的狀態, 則用git push  一次送到Remote Repository。如此相較於SVN, 版本更迭版頻率就不會太快,且每次commit 也不用連在網路上, 除非要push。


Remote Repository 可以選擇免費的Git Server平台, 如SourceforgeBitbucketGitHub, 可以自己先去申請一個帳號. 不過免費帳號是Public Repository, 任何人都可以找到並clone 你的專案, 若付費可以做成private Repository. (一個月大約是7美金, 以GitHub來說的話) 


Github


Git Client 端工具

Git Client 端工具也有很多, 因為過去已習慣使用TortoiseSVN 的界面, 所以使用Git, 也就使用
TortoiseGit。安裝方式,就是從頭到尾到只按"下一步" 就可以安裝完成。

使用TortoiseGit 必須要有 command line 的 git.exe , 故安裝TortoiseGit 須先行安裝 Git for Windows 2.0+

Tortoise 裝完後, 對資料匣按右鍵可以看到TortoiseGit 相關的工具選單


Git 和Remote Repository 有兩種溝通方式,可以使用 https 方式和 ssh 方式。
若使用SSH 會有RSA public/private key 要去產生及設定, 相對而言複雜許多.用 https 設定上其實簡單許多。 

常用的動作:


  • Git clone: 貼上GitHub上的"Clone With HTTPS"的網址, 即可獲得整個專案程式碼


與Local Repository 相關指令


  • git add : 於local repository 中,新增檔案/目錄 (staged)
  • git del :  於local repository 中,刪除檔案/目錄 (staged)
  • git commit : commit只發生在local repository, 並且會記錄在修改歷程記錄檔案中, 若要將此歷程記錄分享到Remote repository, 就執行git push
  • revert: 這個動作就如同 svn update (以Local Repository所記錄的狀態為更新還原的狀態)


與Remote Repository 有關指令


"Git Sync" : 使Local Repository和Remote Repository 達到一致
  • git push : 將Local repository 送到 remote repository, 別人才看得見。git push之前, 要先git pull 取得最新的遠端變更,才能進行git push (此如同svn update 才進行svn commit 以防止版本衝突)。
  • git fetch: 只取得最新的 HEAD
  • git pull : git fetch + merge to local (會從Remote Repository下載最新的歷程記錄,並且自動Merge到Local Repository)

your local repository consists of three "trees" maintained by git. the first one is your Working Directory which holds the actual files. the second one is the Index which acts as a staging area and finally the HEAD which points to the last commit you've made.


TortoiseGit與GitHub 基本操作


  1. 複製git code : git clone https://github.com/xxxxx/project.git
  2. git add  <files>
  3. git commit   <files or *>  
    單純執行 git commit 僅會顯示那些檔案有改過 (即Un-staged 狀態) 
  4. Push 到GitHub: 對clone下來的資料匣, 按右鍵push, 輸入GitHub的username/password。若不是受邀的username , 則必須在Github 上邀請此username成為collaborators
  

輸入GitHub 帳密

push 成功


----------------

其他Git指令: 

查看變更記錄 git log


git Revert : 還原


參考