顯示具有 影像處理 標籤的文章。 顯示所有文章

2021年2月28日 星期日

物件偵測 (#1/5): MS COCO的資料集格式


在進行AI圖像上, 常會看到MS COCO的資料集,

COCO 的圖片資料集,提供3種標注檔:object instances(用於物件偵測), person keypoints(人的關鍵點,用於姿態識別)以及 image captions(圖像標題, 5 captions per image) , 每種標注類型都有相應的json 檔。標注檔也分好了訓練集、驗證集。


with open(annotation_file, "r") as f:
    data = json.load(f)
    annotations=data["annotations"]
    images=data["images"]
    categories=data["categories"]


print(f"Number of images: {len(annotations)}")
print(f"Number of images: {len(images)}")
print(f"Number of images: {len(categories)}")

The COCO dataset has been downloaded and extracted successfully.
Number of images: 36781
Number of images: 5000
Number of images: 80

images[60] => 取出index 60 這張圖的資訊

{'license': 1,
 'file_name': '000000360661.jpg',
 'coco_url': 'http://images.cocodataset.org/val2017/000000360661.jpg',
 'height': 480,
 'width': 640,
 'date_captured': '2013-11-18 21:33:43',
 'flickr_url': 'http://farm4.staticflickr.com/3670/9709793032_f9ee4f0aa2_z.jpg',
 'id': 360661}

annotations[60] => 取出index 60 annotations資訊

{'segmentation': [[267.51,
   222.31,
   292.15,
   222.31,
   291.05,
   237.02,
   265.67,
   237.02]],
 'area': 367.89710000000014,
 'iscrowd': 0,
 'image_id': 525083,
 'bbox': [265.67, 222.31, 26.48, 14.71],
 'category_id': 72,
 'id': 34096}


annotation{
    "id": int,    
    "image_id": int,
    "category_id": int,
    "segmentation": RLE or [polygon],
    "area": float,
    "bbox": [x,y,width,height],
    "iscrowd": 0 or 1,
}


每一張圖片會有一個image_id, 而一張圖可能包含一個以上的單一物件或群物件. 針對每一個物件,
不論是單一物件或群物件, 都會用一個annotation來表現物件內容.. 一張圖會有多個annotation, 即多個物件


annotation{
 "id": int, ==> 物件id
 "image_id": int, ==> 所屬的圖片
 "category_id": int, ==>此物件的類別id
 "segmentation": RLE or [polygon], ==> 單一物件或一群物件的區域描述
 "area": float, ==> 物件區域的Pixel總數
 "bbox": [x,y,width,height], ==> bounding box的座標
 "iscrowd": 0 or 1, ==> 0: 單一物件, 1: 一群物件 (如:一群觀眾) 
}


其中"segmentation": 若為單一物件, 則是以一個多邊形的座標點 [X1,Y1,X2,Y2, ....] 來描述此物件的區塊位置.
若是一群物件的區域描述, 如要描述一群蘋果,則會用Mask的方式來描述,如下圖所示。


一群物件的區域描述, 即iscrowd=1, 則segmentation的內容為

{'counts': [671, 10, 2, 2, 4, 22, 6, 31, 1, 11, 1, 10, 379, 16, 1, 25, 5, 55, 378, 43, 4, 55, 378, 44, 3, 55, 378, 44, 3, 55, 378, 44, 3, 55, 378, 44, 3, 55, 378, 44, 4, 54, 379, 29, 1, 16, 1, 54, 380, 28, 2, 15, 2, 53, 382, 23, 6, 15, 1, 8, 21, 1, 3, 3, 5, 12, 384, 20, 8, 16, 40, 12, 384, 16, 14, 15, 40, 10, 386, 10, 21, 14, 40, 8, 388, 8, 22, 15, 41, 3, 393, 3, 25, 15, 465, 15, 465, 15, 466, 14, 467, 13, 468, 12, 469, 10, 471, 8, 474, 3, 983, 7, 472, 9, 470, 11, 454, 6, 1, 20, 452, 28, 451, 30, 449, 31, 448, 33, 447, 34, 446, 35, 445, 35, 445, 35, 445, 35, 445, 36, 445, 36, 445, 35, 447, 33, 450, 30, 450, 30, 450, 12, 1, 17, 451, 10, 3, 16, 452, 8, 6, 13, 455, 4, 12, 8, 474, 3, 50865, 6, 459, 6, 8, 11, 454, 27, 452, 29, 450, 31, 448, 32, 448, 32, 448, 32, 448, 32, 448, 32, 448, 32, 448, 31, 450, 29, 452, 20, 2, 4, 456, 7, 1, 3, 1, 4, 7174, 6, 2, 6, 4, 14, 447, 34, 445, 36, 443, 38, 442, 38, 442, 38, 442, 38, 442, 38, 442, 38, 442, 38, 443, 36, 445, 34, 446, 6, 19, 6, 450, 3, 478, 1, 42714, 6, 473, 8, 471, 10, 469, 15, 465, 18, 462, 19, 461, 21, 459, 22, 458, 24, 456, 26, 455, 25, 456, 24, 458, 22, 461, 18, 463, 16, 466, 3, 5, 3, 3840, 7, 463, 20, 459, 22, 457, 27, 448, 33, 446, 35, 437, 44, 435, 46, 433, 47, 432, 48, 432, 48, 432, 48, 432, 48, 432, 30, 4, 14, 432, 29, 7, 12, 432, 29, 8, 10, 433, 29, 9, 8, 435, 13, 1, 1, 2, 10, 12, 3, 439, 12, 6, 7, 456, 10, 471, 3, 3, 2, 474, 1, 478, 2, 477, 3, 476, 4, 476, 9, 470, 11, 469, 12, 468, 13, 467, 14, 7, 1, 458, 23, 457, 23, 457, 23, 458, 22, 459, 21, 461, 19, 463, 18, 462, 19, 461, 20, 1, 9, 450, 33, 447, 34, 446, 36, 444, 37, 443, 38, 443, 38, 443, 37, 445, 35, 450, 7, 2, 21, 459, 21, 460, 20, 461, 19, 463, 3, 3, 10, 471, 8, 474, 3, 18209, 1, 479, 2, 478, 3, 477, 4, 476, 5, 475, 6, 474, 7, 474, 10, 471, 8, 474, 4, 5302, 7, 447, 4, 26, 4, 445, 6, 1, 15, 11, 3, 443, 29, 6, 3, 442, 32, 4, 2, 442, 38, 442, 38, 442, 38, 442, 38, 442, 38, 442, 37, 444, 16, 1, 18, 446, 8, 1, 3, 6, 3, 4, 8, 449, 3, 22, 4, 46076, 6, 468, 13, 466, 15, 461, 20, 459, 21, 458, 22, 457, 23, 457, 23, 457, 23, 457, 23, 457, 22, 458, 21, 459, 20, 460, 20, 461, 19, 462, 18, 463, 17, 462, 18, 461, 19, 460, 19, 461, 19, 461, 19, 461, 19, 461, 19, 461, 19, 461, 19, 461, 18, 463, 16, 465, 8, 1, 3, 470, 4, 31194, 12, 9, 6, 452, 29, 445, 36, 443, 38, 441, 39, 435, 45, 434, 46, 427, 53, 426, 54, 425, 55, 424, 55, 425, 54, 426, 53, 427, 51, 429, 25, 1, 24, 430, 22, 5, 22, 210], 'size': [480, 640]}


References:


尚有其他訓練影像的標記格式, 如PASCAL VOC 以XML格式儲存, TensorFlow Object Detection 以.csv 儲存, 而Darknet (Yolo) 以.txt 儲存

2019年5月6日 星期一

OpenVINO教學-OpenVINO model optimizer錯誤排解


www.ittraining.com.tw狀況一、OpenVINO model optimizer 發生內部錯誤

當使用Intel OpenVINO model optimizer 轉換tensorflow pb modelIR (Intermediate Representation) model時出現…… Exception occurred during running replacer "REPLACEMENT_ID (<……>)": list index out of range ……等訊息。


        出現此現象表示輸入之pb model可能未進行Freeze動作或Freeze動作未完全,故可參考
https://stackoverflow.com/questions/45466020/how-to-export-keras-h5-to-tensorflow-pb將整個tensorflow session完全freeze,再行轉換即可成功。

Reference:

    
狀況二、使用OpenVINO model optimizer 出現 __new__() got an unexpected keyword argument 'serialized_options' 錯誤

      當使用Intel OpenVINO model optimizer 轉換tensorflow pb model至IR (Intermediate Representation) model時出現以下錯誤訊息:

[ ERROR ]  Error happened while importing tensorflow module. It may happen due to unsatisfied requirements of that module. Please run requirements installation script once more.
Details on module importing failure: __new__() got an unexpected keyword argument 'serialized_options'

[ ERROR ]

Detected not satisfied dependencies:
        tensorflow: package error, required: 1.10.0

表示系統所安裝之protoc(Protocol Buffer) binary與python protobuf package版本不一致所致。可使用以下3組指令確認系統目前所安裝之版本。

1.系統Global protoc binary version
protoc --version

2.使用pip所安裝之版本
pip list|grep protobuf

3.python3 interpreter實際抓到使用的版本
python3 -c "from google import protobuf;print(protobuf.__version__);print(protobuf.__file__)"


指令1更版方式:
#Make sure you grab the latest version
wget 
https://github.com/google/protobuf/releases/download/v3.7.1/protoc-3.7.1-linux-x86_64.zip

# Unzip
unzip protoc-3.7.1-linux-x86_64.zip -d protoc3.7.1

# Detemine Directory, if exist delete it
if [ -d " protoc3.7.1" ]; then
    # Directory protoc3.7.1 exists
    echo "Directory protoc3.7.1 exists. Remove it."
    sudo rm -r protoc3.7.1
fi

# Move protoc to /usr/local/bin/
sudo mv protoc3.7.1/bin/* /usr/local/bin/

# Detemine Directory, if exist delete it
if [ -d "/usr/local/include/google" ]; then
    # Directory /usr/local/include/google exists
    echo "Directory /usr/local/include/google exists. Remove it."
    sudo rm -r /usr/local/include/google
fi

# Move protoc3/include to /usr/local/include/
sudo mv protoc3.7.1/include/* /usr/local/include/

# Optional: change owner
sudo chown $USER /usr/local/bin/protoc
sudo chown -R $USER /usr/local/include/google

# Delete protoc3.7.1 directory
rm -r protoc3.7.1

指令2更版方式:
Pip install -U -force-reinstall protobuf==3.7.1

指令3更版方式:
若dist-package有使用easy-install (EGG)安裝之套件,則依該套件的方法移除後重新執行指令2的更版方式即可修復

~強烈建議在Linux環境下使用virtualenv、Windows環境下使用anaconda做python環境控管~


2018年10月24日 星期三

工程師不可不知的影像辨識 3 階段


AI 時代中,「#影像辨」是其中一項熱門的應用,在許多產業都可以見到「影像辨」的蹤跡。若你擁有「影像辨」的技術,意味著你所擁抱的機會更大。然而這項技術實際上有許多眉眉角角」影響著專案的成果,如何讓你的「影像辨識」專案的準確率更高呢?更符合你設定的目標呢?

首先在第1個階段,從低階的處理技術進行 #影像預處 (image preprocessing)。由於你所取得的影像資訊可能有尺寸大小不一、雜訊(noise)、對比度差異等問題,而為了增加後續作業的準確率,依據你所取得的影像狀況,你可以用 #OpenCV 這項工具進行 #影像預處理 的工作,像是 #對比度增 #去雜 #尺寸重 等。

接著在第2階段,運用 #OpenCV 進行像是 #影像閾值#形態學轉#Canny邊緣檢#Harris角點檢 等演算法來擷取 #影像特,方便後續的影像處理作業,像是 ##Segmentation) #(#Classifiacation)等。

然後在第3個階段,運用 #Tensorflow#Keras  #AI 工具建立 #深度學#DeepLearning)模型,讓演算法去 #擷取影像特 進行模型訓練,依據結果,在流程中的相應環節進行調整,讓機器實現「#」的目的。

如果你對影像辨識有濃厚的興趣,並且希望學習不是只有聽聽就忘了,而是能真正從影像處理、影像偵測,一直到影像辨識/感知 完整學會與產業接軌的技術,歡迎加入艾鍗的學習行列。

小班制教學 : 與老師一對一的互動,可以讓你的問題可以得到快速解答。
主題式實作演練 : 循序漸進的主題式引導搭配學員上機演練,讓你自然而然地學會關鍵技術,牢牢記住。
完整範例程式碼 : 程式碼均由老師debug(除錯)過,並附詳細解說加上秘技,讓你複習有依據,學習高成效,不會再因為卡關而放棄成就自己的機會。
產業工程師親授 : 學到書本上沒有的知識,賺到老師實務開發的經驗。而且有老師帶著學,學得更快。

別在把人生白白蹉跎掉,你值得更好的未來!
立即預約專業諮詢,請撥(02)2316-7736
=============================
<AI
影像系列課程>
💡AI深度學習與影像辨識 http://bit.ly/2NRDM5a
💡機器人AI視覺整合實務 http://bit.ly/2PMpYFU
💡影像辨識與邊緣運算實戰
 http://bit.ly/2PRvvuK


2018年8月28日 星期二

影像型能學運算 (Morphological Operations)


影像型能學運算 (Morphological Operations):

形態學主要用於二值化後的影像,根據使用者的目的,用來凸顯影像的形狀特徵,像邊界和連通區域等,同時像細化、像素化、修剪毛刺等技術也常用於圖像的預處理和後處理,
In short: A set of operations that process images based on shapes. Morphological operations apply a structuring element to an input image and generate an output image.

The most basic morphological operations are two: Erosion and Dilation. They have a wide array of uses, i.e. :


  1. Removing noise
  2. Isolation of individual elements and joining disparate elements in an image.
  3. Finding of intensity bumps or holes in an image


膨脹(Dilation)==> 白色區域影像變胖

Left image: original image inverted, right image: resulting dilatation


侵蝕(Erosion)  ==>  白色區域影像變瘦

Left image: original image inverted, right image: resulting erosion


斷開(Opening):  Erosion再Dilation 可以將硬幣分離


References:

  1. https://slidesplayer.com/slide/11398438/
  2. http://monkeycoding.com/?p=577
  3. http://blog.christianperone.com/2014/06/simple-and-effective-coin-segmentation-using-python-and-opencv/

2018年8月26日 星期日

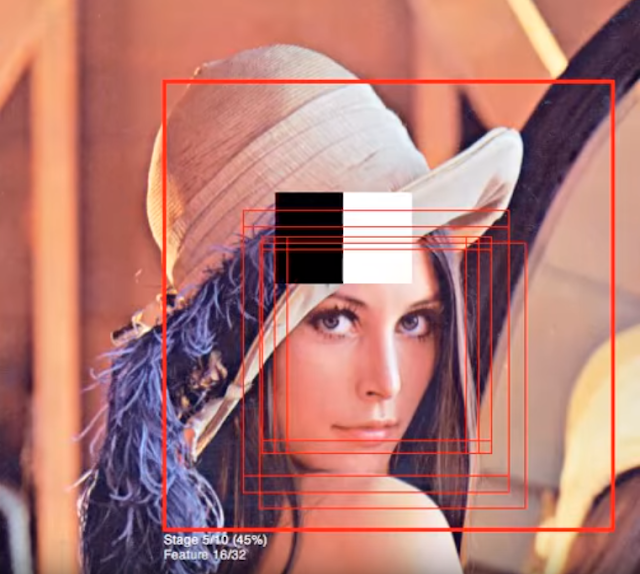
HAAR Face Detection


Face Detection using Haar Cascades

利用 HAAR 分類器(包含不同的偵測dataSet), 用一個windw size 下, 不同Feature都有得到不同的分數.  再用不同window size, 再去掃,


整個演算法跑完之後, 顯示的這些不同矩形框,就是那些"疑似有人臉"出現的地方..


上課範例:

Haar-cascade Detection in OpenCV


2018年8月11日 星期六

VS2017 設定Tesseract-OCR的編譯環境


Tesseract是一個光學字元識別引擎,支援多種作業系統。

[Include 目錄] (增加一項)


[程式庫目錄] 


[其他相依性] 


[C/C++ 前置處理器] 前置處理器定義


設定完成後, 執行上課範例, 可以看見原始影像為TAW-8686.jpg 然後看看Tesseract識別引擎的效果. 理論上"乾淨"的圖識別的效果應該100%正確!


但實際上取得的車牌影像不會如此乾淨, 車牌會有污點、影像對比度可能也不足(光線影響)、拍攝角度不對以及有其他的文字、符號等等., 都得再經過影像處理的手法重新把影像"惡搞"後,才能丟入OCR去做後續的文字分析識別


台灣的車牌


影像經過二值化處理,將原始影影像轉換成"黑白"影像, 至於Threshold value 怎麼選, 這就是學問所在啦~


若想要用自己的識別引擎去分析文字或一些特定的符號,也可以自己去訓練。訓練的方法可以用現在很夯的AI方法如Deep Learning  CNN來訓練模型,像是 MINST 手寫數字辨識 這種資料集(Data Set) 模型可以讓你識別出0~9的手寫數字。

不過在做真正的影像識別的應用,通常得經過一些影像處理的技巧, 例如進行二值化 (Thresholding)、閾值分析、影像去雜訊、影像模糊、影像強化、影像縮放、色彩空間轉換及影像切割等,才餵進到識別引擎,以獲得較高的辡別率。因此,對影像進行預處理,總是避免不了~


2018年4月13日 星期五

Convolution 的意義


Convolution 的意義
The convolution of f and g is written fg, using an asterisk or star. It is defined as the integral of the product of the two functions after one is reversed and shifted. As such, it is a particular kind of integral transform:


Convolution3.svg


隨著不同的 t 值, 對f和g函數相乘的積分(求重疊時的面積)...


Convolution of box signal with itself2.gif


Convolution of spiky function with box2.gif


https://goo.gl/EcCcj7

2018年4月11日 星期三

高斯模糊

常態分配


# 一維的常態分配為, 為一個鐘型分佈曲線, 中間高, 兩旁低

常態分布normal distribution)又名 高斯分布(Gaussian distribution)


若隨機變數X服從一個位置參數為μ、尺度參數為σ的常態分布,記為:

X~N(μ,σ²)

μ決定中心點位 置, 而其變異數σ²的開平方或標準差σ決定了資料分散的程度。

「常態分配」的圖片搜尋結果


# 二維的常態分配為一個等高線圖是從中心開始呈常態分布的同心圓中間點最高而離中間點愈遠值愈低


高斯模糊

高斯模糊的原理它是一種資料平滑技術(data smoothing),它用常態分布計算圖像中每個像素的變換。適用於多個場合,影像處理恰好提供了一個直觀的應用實例。

糊方法就是讓圖像中的每一個Pixel的值, 變成取其"周圍點"的平均值。若周圍的範圍愈大,則會模糊的程度會愈強。在數值上,這是一種"平滑化"。而在圖形上,就相當於產生"模糊"效果,使原始Pixel失去細節。


如果使用簡單平均,顯然不是很合理,因為圖像都是連續的,越靠近的點關係越密切,越遠離的點關係越疏遠。因此,採用加權平均更合理,距離越近的點權重越大,距離越遠的點權重越小。那分配權重的方式是什麼? 可以採用"常態分配"來配置權重。愈近的pixel 權重愈高,愈遠的pixel 權重愈低。

高斯矩陣

這是一個計算σ = 0.84089642的高斯分布生成的範例矩陣。注意中心元素 (4,4)處有最大值,權重隨著距離中心越遠數值對稱地減小。
0.000000670.000022920.000191170.000387710.000191170.000022920.00000067
0.000022920.000786330.006559650.013303730.006559650.000786330.00002292
0.000191170.006559650.054721570.110981640.054721570.006559650.00019117
0.000387710.013303730.110981640.225083520.110981640.013303730.00038771
0.000191170.006559650.054721570.110981640.054721570.006559650.00019117
0.000022920.000786330.006559650.013303730.006559650.000786330.00002292
0.000000670.000022920.000191170.000387710.000191170.000022920.00000067
注意中心處的0.22508352比3σ外的0.00019117大1177倍。

上述矩陣總和為1,即代表各權重位置的佔比。將原始影像中每一個pixel 乘上此高斯矩陣並加總,即為新的pixel值。

如果是彩色的, 則RGB 3個channel 都做同樣的高斯模糊動作


圖1:原始圖像 圖2:經過高斯模糊處理的圖像


https://goo.gl/EcCcj7